Kargil Vijay Diwas – 1999 War
Kargil Vijay Diwas – 1999 War

Commemoration Day: 26 July
Operation: Operation Vijay
Martyrs: 533
Awards: 4 PVC, 9 MVC, 27 VrC
Kargil Vijay Diwas – 1999 War
Kargil Vijay Diwas, observed on 26th July every year, marks India’s hard-fought victory in the Kargil War of 1999. It commemorates the successful culmination of Operation Vijay, a military campaign under which the Indian Armed Forces reclaimed the high-altitude outposts in the Kargil region that had been illegally occupied by Pakistani intruders. This day stands as a testament to the bravery, sacrifice, and determination of the Indian soldiers who fought against incredible odds to protect the nation’s sovereignty.
The conflict began in the winter of 1998 and early 1999, when militants disguised as Mujahideen infiltrated across the Line of Control (LoC) into Indian territory. These infiltrators, covertly trained and backed by the Pakistani armed forces, occupied unguarded posts in the Kargil sector. Their aim was to sever the crucial supply line between Srinagar and Ladakh, destabilize Indian positions in the region, and gain strategic control over areas such as Siachen Glacier.
The intrusions remained undetected for months but were eventually discovered in May 1999 when Indian patrol units identified suspicious activity. By then, the intruders had established fortified positions across key areas, including Drass, Kaksar, and Mushkoh sectors. Realizing the extent of Pakistan’s involvement, the Indian government launched Operation Vijay to flush out the infiltrators and restore control over the occupied peaks.
The Indian Army faced significant challenges in reclaiming the peaks. The enemy occupied high-altitude positions, making direct assaults perilous. The Indian troops, however, showed extraordinary valor and resilience, attacking the enemy under harsh weather conditions and treacherous terrain. The National Highway 1D, the lifeline connecting Ladakh to the rest of India, was one of the primary battle zones.
Battle for Tololing
The Tololing Ridge, a strategically significant region, was heavily fortified by Pakistani forces. The 2nd Rajputana Rifles, supported by 18 Grenadiers, launched a grueling three-week assault to capture the position. The battle came at a heavy price, with 23 Indian soldiers sacrificing their lives. The recapture of Tololing marked a turning point in the conflict, allowing Indian forces to push deeper into enemy-held territories.
Victory at Tiger Hill
Tiger Hill, the highest peak in the Kargil region, became the centerpiece of the war. It offered a commanding view of the entire battlefield and had to be reclaimed at all costs. After weeks of fighting in hostile conditions, the 18 Grenadiers launched a final assault on 4th July 1999. In a fierce 11-hour battle, Indian forces recaptured Tiger Hill, breaking the backbone of the Pakistani incursion and signaling an imminent victory for India.
Role of the Indian Air Force: Operation Safed Sagar
While the Indian Army carried out ground assaults, the Indian Air Force (IAF) played a pivotal role under Operation Safed Sagar. The IAF conducted precision strikes on enemy bunkers, supply lines, and strongholds, providing vital air support to ground troops. Their efforts significantly aided the army’s advances and disrupted the enemy’s operations.
Facing mounting battlefield losses and international pressure, the then Pakistani Prime Minister Nawaz Sharif sought intervention from the United States. However, global opinion favored India’s legitimate claim to the territory, and Pakistan was forced to withdraw its troops. By 26th July 1999, the Indian Armed Forces successfully cleared the Kargil sector of all infiltrators, and Operation Vijay was declared a success.
The victory at Kargil came at a great cost. India lost 527 brave soldiers, and many others sustained injuries while fighting for their country. The courage and sacrifice of the Indian soldiers were recognized with numerous gallantry awards, including:
4 Param Vir Chakras (India’s highest military honor for bravery)
9 Maha Vir Chakras
Several Vir Chakras
Kargil Vijay Diwas is not just a day of victory but also a day to honor and remember the sacrifices of India’s heroes. Across the country, tributes are paid to the fallen soldiers through commemorative events, patriotic programs, and memorial ceremonies. The Kargil War Memorial in Dras, Ladakh, remains the focal point of celebrations, where soldiers, veterans, and families of martyrs gather to pay homage to the bravehearts.
This day serves as a powerful reminder of the unwavering dedication and resilience of the Indian Armed Forces, inspiring future generations to uphold the values of courage, sacrifice, and patriotism.
The Kargil War unfolded in three distinct phases. In the initial phase, Pakistan covertly infiltrated its forces into the Indian-controlled regions of Kashmir, occupying strategic high-altitude positions. These locations allowed Pakistan to target National Highway 1 (NH1), a crucial supply route connecting Srinagar to Leh, with artillery fire, thereby threatening India’s logistical operations.
In the second phase, India detected the infiltration and recognized the scale of the intrusion. This led to the swift mobilization of Indian forces to counter the threat and reclaim the occupied territories. Preparations for a coordinated military response, including ground assaults and air support, were initiated to address the challenge posed by the entrenched Pakistani forces.
The final phase witnessed intense battles between Indian and Pakistani troops in the rugged terrain of the Kargil region. Indian forces launched determined offensives to regain control of the occupied peaks and ridges. After weeks of fierce combat, India succeeded in recapturing the majority of the infiltrated territories. Under mounting international pressure, Pakistan was ultimately compelled to withdraw its forces back across the Line of Control (LoC), marking a decisive victory for India.
Occupation by Pakistan

Infiltration and military build-up
During the harsh winter months, the extreme cold and heavy snowfall in the mountainous areas of Kashmir made it challenging for both the Indian and Pakistani Armies to maintain a permanent presence at certain forward posts along the Line of Control (LoC). As a result, it was common practice for both sides to vacate these posts temporarily and scale down patrolling in regions that could potentially serve as infiltration routes. Once the weather improved, the abandoned posts would typically be reoccupied, and regular patrolling would resume.
In February 1999, however, Pakistan took advantage of this seasonal practice. While reoccupying its forward posts on their side of the LoC in the Kargil region, the Pakistan Army also initiated a covert operation to infiltrate and occupy positions on the Indian side. Troops from the elite Special Services Group (SSG), along with approximately four to seven battalions of the Northern Light Infantry—a paramilitary regiment that was not part of the regular Pakistani Army at the time—were strategically deployed. These forces occupied key vantage points deep within the Indian-controlled region. Some reports suggest that these infiltrators were supported by Kashmiri militants and Afghan mercenaries, further strengthening Pakistan’s operational capacity.
The Pakistani incursions took place across several critical sectors. They established strongholds in the heights of the lower Mushkoh Valley, along the Marpo La ridgeline in Dras, near Kaksar in the vicinity of Kargil, and in the Batalik sector located east of the Indus River. Additionally, Pakistani forces infiltrated the heights above the Chorbatla sector, where the LoC bends northward, and extended their positions into the Turtok sector, situated south of the strategically significant Siachen Glacier area.
By securing these high-altitude posts, Pakistan gained a significant tactical advantage, threatening India’s supply lines and creating a formidable challenge for the Indian Army to reclaim its territory.
India discovers infiltration and mobilizes
Initially, the Pakistani incursions into Indian territory went undetected for several reasons. Indian patrols were not regularly sent into some of the areas infiltrated by Pakistani forces, and heavy artillery shelling by Pakistan in specific regions provided effective cover for the intrusions. By the second week of May 1999, the situation changed dramatically when an Indian patrol team, led by Captain Saurabh Kalia, was ambushed in the Batalik sector. This action followed a tip-off from a local shepherd, which ultimately exposed the infiltration.
At first, Indian forces believed the infiltrators to be jihadis and assumed that they could be evicted within a few days. However, further investigations revealed a much larger-scale intrusion along multiple sectors of the Line of Control (LoC). The tactics employed by the infiltrators were markedly different, leading the Indian Army to recognize that this was not a minor insurgency but a well-organized military operation planned by the Pakistan Army. The total area seized by Pakistani forces was estimated to be between 130 km² to 200 km².
In response to the escalating situation, the Government of India launched Operation Vijay, which involved the mobilization of approximately 200,000 Indian troops. However, due to the treacherous terrain and high-altitude conditions of the Kargil region, large-scale divisional and corps-level operations could not be conducted. Instead, the fighting was largely carried out at the regimental and battalion levels. In total, about 20,000 soldiers from two divisions of the Indian Army, along with several thousand personnel from India’s paramilitary forces and the Indian Air Force, were actively deployed in the conflict zone. This brought the total strength of Indian troops involved in the Kargil-Drass sector to nearly 30,000.
On the opposing side, the number of Pakistani infiltrators, including those providing logistical and artillery support, was estimated to be approximately 5,000 at the peak of the conflict. This figure also included troops from Pakistan-administered Kashmir, who contributed additional firepower and artillery assistance to the Pakistani forces.
To support ground operations, the Indian Air Force launched Operation Safed Sagar, a critical aerial campaign aimed at providing air support to Indian troops. However, the operation faced significant challenges due to the high altitude and adverse weather conditions. These factors limited the bomb loads that aircraft could carry and restricted the number of airstrips available for operations. Despite these challenges, the coordinated efforts of the Indian Army and Air Force played a pivotal role in countering the infiltration and reclaiming lost territory.
Naval Action
The Indian Navy played a crucial role during the Kargil conflict by initiating Operation Talwar, aimed at blockading Pakistan’s key ports, particularly the Karachi port, to disrupt supply routes. Both the western and eastern fleets of the Indian Navy mobilized in the North Arabian Sea, where they conducted aggressive patrols and demonstrated their capability to sever Pakistan’s vital sea-based oil imports and trade flows. This strategic move created immense pressure on Pakistan, which heavily relied on maritime routes for its energy and trade supplies.
Later, Pakistan’s then-Prime Minister, Nawaz Sharif, revealed that Pakistan had been left with only six days’ worth of fuel reserves to sustain itself had a full-scale war erupted. The Indian Navy’s preparedness and assertive positioning significantly weakened Pakistan’s strategic options during the conflict and underscored India’s dominance in the maritime domain.
India attacks Pakistani positions
The terrain of Kashmir is characterized by rugged mountains and high altitudes, presenting significant logistical challenges. Even the best infrastructure, such as National Highway 1D—the critical link between Leh and Srinagar—is a narrow, two-lane road. The combination of rough terrain and narrow pathways not only slowed down the movement of vehicles and troops but also created complications for air operations. The high altitude reduced the payload capacity of aircraft, further complicating logistical support for Indian forces.
The Pakistani forces, having occupied vantage observation posts, gained a clear line-of-sight over key sections of NH 1D. This allowed them to launch indirect artillery fire on the highway, inflicting heavy casualties and disrupting Indian supply lines. Control of this stretch of the highway became a critical priority for India, as it served as the main logistical and supply route for the Indian Army. The Pakistani shelling of this arterial road not only jeopardized critical supplies but also posed a serious threat of cutting off Leh from the rest of the country. While an alternative route to Leh existed via Himachal Pradesh, it was significantly longer, making NH 1D indispensable during the conflict.
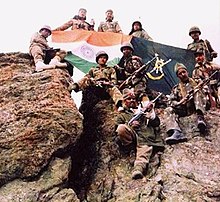
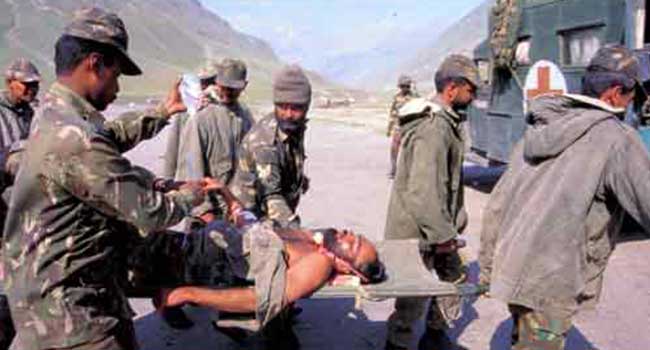
Indian soldiers after winning a battle during the Kargil War
Once India regained control of the critical hills overlooking NH 1D, the focus shifted to driving the invading forces back across the Line of Control (LoC). Battles like the Battle of Tololing marked a turning point, slowly tilting the conflict in India’s favor. Pakistani troops at Tololing received support from Kashmiri militants, making the fight particularly intense. Some positions, such as Tiger Hill (Point 5140), resisted fiercely and fell only later in the war. At Tiger Hill, Indian troops encountered well-entrenched Pakistani soldiers, resulting in heavy casualties on both sides. The final assault claimed the lives of 10 Pakistani soldiers and 5 Indian soldiers, but ultimately, the peak was recaptured by Indian forces.
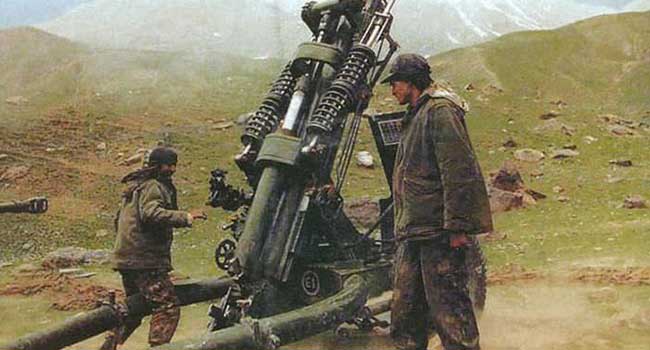
Several assaults took place atop previously unnamed peaks, identified only by their Point numbers, with fierce hand-to-hand combat marking many engagements. To support ground operations, India deployed about 250 artillery guns, which played a key role in targeting infiltrators occupying posts in the line-of-sight. The Bofors FH-77B field howitzers proved to be instrumental, with Indian gunners using the terrain to their advantage. However, in some areas, the lack of space and depth for proper deployment limited the effectiveness of artillery.
Aerial attacks were also used, albeit with limited success due to the challenging terrain. The Indian Air Force (IAF) employed French-made Mirage 2000H jets, which dropped laser-guided bombs to destroy well-fortified Pakistani positions. Despite these efforts, the IAF faced setbacks: a MiG-27 strike aircraft was lost due to engine failure, while a MiG-21 fighter jet was shot down by Pakistani forces. Initially, Pakistan claimed to have downed both jets after they crossed into its territory. Additionally, an Mi-8 helicopter was lost to Stinger surface-to-air missiles (SAMs).
On 27 May 1999, Flt. Lt. Nachiketa experienced engine trouble in the Batalik sector and was forced to eject. Sqn Ldr Ajay Ahuja, attempting to locate and rescue his comrade, was shot down by a Stinger missile. Although Ahuja safely ejected from his plane, his body was returned riddled with bullet wounds, suggesting he had been killed after capture.
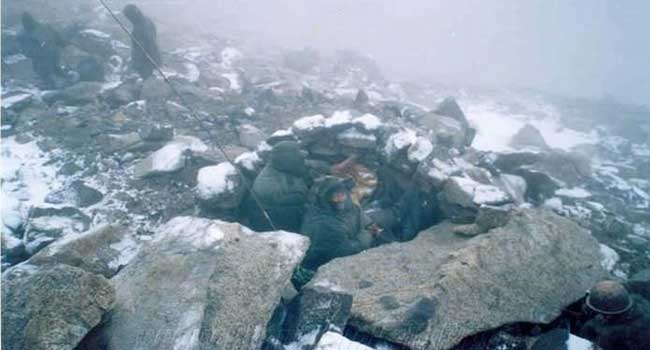
Despite artillery and air power, many Pakistani outposts, well beyond visible range, could not be dislodged. The Indian Army had to rely on direct frontal ground assaults, which were slow, grueling, and incurred heavy casualties due to the steep climbs up peaks as high as 18,000 feet (5,500 meters). Daylight attacks were impossible, forcing Indian troops to advance under the cover of darkness in freezing temperatures, which often plummeted to -15°C to -11°C (5°F to 12°F) after accounting for wind chill.
Some military analysts later argued that a blockade of supply routes, effectively creating a siege, could have avoided such costly frontal assaults. However, this strategy would have required Indian troops to cross the LoC or conduct airstrikes on Pakistani territory—moves that India refrained from, fearing an escalation of the conflict and potential loss of international support.
By the second month of the conflict, Indian forces had recaptured most of the ridges and peaks that had been infiltrated. Official estimates suggest that 75%–80% of the intruded territory, including nearly all key high-altitude positions, was back under Indian control by the end of the operation.
Withdrawal and final battles
After the conflict erupted, Pakistan sought assistance from the United States to help de-escalate the situation. Bruce Riedel, a key aide to President Bill Clinton, reported that U.S. intelligence had detected the movement of nuclear weapons by Pakistan to forward deployments, fearing that the fighting could escalate into a broader war. However, President Clinton refused to intervene until Pakistan withdrew its forces from the Indian side of the Line of Control (LoC). This led to the Washington Accord on July 4, 1999, in which Prime Minister Nawaz Sharif agreed to pull back Pakistani troops. After this agreement, the intensity of the fighting gradually decreased, although some Pakistani forces remained entrenched on the Indian side of the LoC.
Despite the diplomatic breakthrough, the United Jihad Council, an alliance of extremist groups, rejected Pakistan’s decision to de-escalate and chose to continue fighting. In response, the Indian Army launched its final offensives in the last week of July. Once the Drass subsector was cleared of Pakistani forces, the fighting officially ended on July 26, a day that India now commemorates annually as Kargil Vijay Diwas (Kargil Victory Day).
By the end of the war, Pakistan was forced to withdraw due to mounting international pressure and the continued intensity of the conflict on the frontlines. As a result, India regained full control of all territories south and east of the Line of Control, as outlined in the Simla Agreement of 1972.
| Date(1999) | Event |
|---|---|
| 03-May | Pakistani intrusion in Kargil reported by local shepherds |
| 05-May | Indian Army patrol sent up; Five Indian soldiers captured and tortured to death. |
| 09-May | Heavy shelling by Pakistan Army damages ammunition dump in Kargil |
| 10-May | Infiltrations first noticed in Dras, Kaksar, and Mushkoh sectors |
| Mid-May | Indian Army moves in more troops from Kashmir Valley to Kargil Sector |
| 26-May | IAF launches air strikes against infiltrators |
| 27-May | IAF loses two fighters – MiG-21 and MiG-27;. Flt Lt Nachiketa taken POW |
| 28-May | IAF MI-17 shot down by Pakistan; four air crew dead |
| 01-Jun | Pakistan steps up attacks; bombs NH 1A |
| 05-Jun | Indian Army releases documents recovered from three Pakistani soldiers indicating Pakistan’s involvement |
| 06-Jun | Indian Army launches major offensive in Kargil |
| 09-Jun | Indian Army re-captures two key positions in the Batalic sector |
| 11-Jun | India releases intercepts of conversation between Pakistani Army Chief Gen Pervez Musharraf, while on a visit to China and Chief of General Staff Lt Gen Aziz Khan in Rawalpindi, as proof of Pakistani Army’s involvement |
| 13-Jun | Indian Army secures Tololing in Dras |
| 15-Jun | U.S. President Bill Clinton, in a telephonic conversation, asks Pakistani Prime Minister Nawaz Sharif to pull out from Kargil |
| 29-Jun | Indian Army captures two vital posts: Point 5060 and Point 5100 near Tiger Hill |
| 02-Jul | Indian Army launches three-pronged attack in Kargil |
| 04-Jul | Indian Army recaptures Tiger Hill after an 11-hour battle |
| 05-Jul | Indian Army takes control of Dras. Sharif announces Pakistani army’s withdrawal from Kargil following his meeting with Clinton |
| 07-Jul | India recaptures Jubar Heights in Batalik |
| 11-Jul | Pakistan begins pullout; India captures key peaks in Batalik |
| 14-Jul | Indian Prime Minister Atal Bihari Vajpayee declares Operation Vijay a success. Government sets condition for talks with Pakistan |
| 26-Jul | Kargil conflict officially comes to an end. Indian Army announces complete eviction of Pakistani intruders. |
| Param Vir Chakra | Maha Vir Chakra | Vir Chakra |
|---|---|---|
| Capt. Vikram Batra, 13 JAK Rifles (Posthumous) | Maj. Vivek Gupta, 2 Raj Rif(Posthumous) | Col Umesh Singh Bawa, |
| Lt. Manoj Kumar Pandey, 1/11 GR(Posthumous) | Maj. Padmapani Acharya, 2 Raj Rif(Posthumous) | Col Lalit Rai, |
| Grenedier Yogender Singh Yadav, 18 Grenadiers | Capt. N Kenguruse, 2 Raj Rif(Posthumous) | Col M.B. Ravindranath |
| Rifleman Sanjay Kumar, 13 JAK Rifles | Naik Digendra Kumar, 2 Rajputana Rifles | Lt Col Yogesh Kumar Joshi, |
| Maj. Rajesh Singh Adhikari, 18 Grenadiers(Posthumous) | Maj S. Vijay Bhaskar, | |
| Lt. Balwan Singh, 18 Grenadiers | Maj Deepak Rampal, | |
| Capt. Anuj Nayyar, 17 Jat(Posthumous) | Maj Vikas Vohra, | |
| Lt. Keshing Clifford Nongrum, 12 JAK LI(Posthumous) | Maj Amrinder Singh Kasana, | |
| Major Sonam Wangchuk, Ladakh Scouts | Maj Rajesh Sah, | |
| Maj Mohit Saxena, | ||
| Maj M. Saravanan (posthumous), | ||
| Capt Shyamal Sinha. | ||
| Capt Amol Kalia (posthumous), | ||
| Capt Sachin Annarao Nimbalkar, | ||
| Capt Sanjeev Singh. | ||
| Capt Haneef Uddin (posthumous). | ||
| Capt Sumeet Roy (posthumous), | ||
| Capt Maridhvodan Veetil Sooraj, | ||
| Capt Jintu Gogoi (posthumous), | ||
| Capt R.Jery Prem Raj (posthumous), | ||
| Lt Vijyant Thapar (posthumous), | ||
| Sub Chhering Stobdan. | ||
| Sub Bahadur Singh (posthumous), | ||
| Sub Lobzang Chhotak (posthumous), | ||
| Sub Randhir Singh (posthumous), | ||
| Sub Bhawar Lal (posthumous), |
Source
- https://en.wikipedia.org
- http://www.thehindu.com
- http://www.indianarmy.nic.in
Disclaimer














KR Goswami
2024 at 9:14 amExcellent portal you have created, sir.
I am KR Goswami, an ex-sgt and retired branch manager at the State Bank of India.
I have projected our heroes in my book
“Valor on the Battlefield: The Param Vir Chakra: 21 Bravest Warriors’ Stories of Heroes in Uniform”
at,
https://relinks.me/B0CFJTXJT7
And also written 35 books,
https://krgoswami.com/global-titles.html
Thank you very much for exposing valor of our heroes.
Great!
KR Goswami
2024 at 9:33 amSome of the recently created videos of the Armed Forces by me
https://www.youtube.com/watch?v=QxiCeS1n-W0 Subconscious Influence of Priming || KR Goswami || Psychologist, Author & Trainer
https://www.youtube.com/watch?v=uMkic-CJabc Kargil Vijay Diwas || Rajat Jayanti || KR Goswami || Armed Forces Recruitment Trainer and Author
https://www.youtube.com/watch?v=M81TiBjzTa8 मेजर राकेश टीआर (तत्कालीन कैप्टन), 9 पैरा (स्पेशल फोर्सेस) के एक टुकड़ी कमांडर || KR Goswami
https://www.youtube.com/watch?v=UYqT_NXHjo Sepoy Ajay Singh Naruka, a brave soldier from Rajasthan’s Jhunjhunu || KR Goswami || Psychologist
https://www.youtube.com/watch?v=b4LGRQ_FG7A General KV Krishna Rao || KR Goswami || Psychologist, Author & Trainer
https://www.youtube.com/watch?v=t8qhEvvjCG8 Brigadier Sant Singh, MVC & Bar (1921-2015) || KR Goswami || Psychologist, Author & Trainer
https://www.youtube.com/watch?v=O42QBZOWuxo Captain Anshuman Singh (Kirti Chakra) || KR Goswami || Psychologist, Author & Trainer
https://www.youtube.com/watch?v=beBq93OHkFY The Brave Sacrifice of Captain Saurabh Kalia in Kargil || KR Goswami, Psychologist, Author & Trainer
Sachin Narkhede
2024 at 1:57 pmYour bravery and sacrifice are beyond words. In the face of danger, you stood tall. Your selflessness and commitment to duty will never be forgotten
Thank you for protecting our freedom and serving our nation with honor
Sarang ahirwar
2024 at 11:48 amKarul Vijay Divas ki hardik shubhkamnaen
Md Amir
2024 at 9:45 amJai Hind
Swapnil Patil
2026 at 12:04 amThank you for your service and bravery for india. Jai hind